<?xml version="1.0" encoding="utf-8"?><feed xmlns="http://www.w3.org/2005/Atom" ><generator uri="https://jekyllrb.com/" version="4.3.4">Jekyll</generator><link href="https://aa55.dev/feed.xml" rel="self" type="application/atom+xml" /><link href="https://aa55.dev/" rel="alternate" type="text/html" /><updated>2026-03-19T20:11:52+05:30</updated><id>https://aa55.dev/feed.xml</id><title type="html">aa55.dev</title><author><name></name></author><entry><title type="html">Unverified software downloads: A significant risk to server security</title><link href="https://aa55.dev/2025/11/16/Unverified-Software-Downloads.html" rel="alternate" type="text/html" title="Unverified software downloads: A significant risk to server security" /><published>2025-11-16T05:30:00+05:30</published><updated>2025-11-16T05:30:00+05:30</updated><id>https://aa55.dev/2025/11/16/Unverified-Software-Downloads</id><content type="html" xml:base="https://aa55.dev/2025/11/16/Unverified-Software-Downloads.html"><![CDATA[<p>Debian started signing their repository packages way back in 2007 with the release of Debian 4.0. Yet somehow we have gone backwards when it comes to validation of downloaded software in recent years.</p>

<p>Most software these days, whether they be package managers for programming languages or container tools that download images, don’t validate the cryptographic integrity of downloads. Downloading over TLS alone is insufficient to protect you against supply chain attacks. Someone who can manage to break into the download server will be able to add a backdoor to the binary. Xubuntu servers got <a href="https://lists.ubuntu.com/archives/xubuntu-devel/2025-October/012209.html">compromised recently</a> and was found serving malware.</p>

<p>In many cases, the download might be happening from a nearby mirror or a CDN. While the upstream project might have good security practices for securing their servers, the same could not be said of the mirror operators.</p>

<p>In some cases, tools produce misleading output. Here in the screenshot below, bastille (a jail manager for FreeBSD) claims that it has validated the checksum. The validation is done by downloading a <code class="language-plaintext highlighter-rouge">MANIFEST</code> text file from the same directory as the software and comparing the checksum of the binary with the contents of the text file.</p>

<table>
  <tbody>
    <tr>
      <td><img src="/assets/images/unverified_software/bastille.png" alt="Screenshot from bastille" /></td>
    </tr>
  </tbody>
</table>

<p>While it will protect you against corrupted downloads, it will not save you from a malicious binary. Although it technically does validate the checksum, my personal expectation is that the tool would have had verified the GPG signature of the binary.</p>

<p>In the absolute worst case, some tools download software over unencrypted HTTP without any cryptographic signature verification whatsoever.</p>

<p>Developers also need to be trained to verify downloads before use. The following is a screenshot from the FreeBSD handbook for setting up a jail. The documentation needs to be updated to encourage people to verify the downloads like how <a href="https://openwrt.org/docs/guide-quick-start/verify_firmware_checksum">OpenWrt does</a></p>

<table>
  <tbody>
    <tr>
      <td><img src="/assets/images/unverified_software/bsd_doc.png" alt="Screenshot from FreeBSD handbook" /></td>
    </tr>
  </tbody>
</table>

<p>Unfortunately i don’t believe verification of the <code class="language-plaintext highlighter-rouge">base.txz</code> file might be possible now since as far as i can see, FreeBSD does not provide any signed checksum for this file.</p>

<h3 id="mitigation-strategies">Mitigation Strategies</h3>

<p>If like me, you too are concerned about this, you can manually build your container images. For Linux, you can use the <code class="language-plaintext highlighter-rouge">debootstrap</code> package which has a <code class="language-plaintext highlighter-rouge">--force-check-gpg</code> option to enforce GPG verification.</p>

<figure class="highlight"><pre><code class="language-shell" data-lang="shell">debootstrap <span class="nt">--force-check-gpg</span> <span class="nt">--include</span><span class="o">=</span>dbus,systemd stable debian </code></pre></figure>

<p>For FreeBSD jails, a workaround is to download the FreeBSD iso file, verify it using the <a href="https://www.freebsd.org/releases/14.3R/signatures/">signed checksums</a> and extract the <code class="language-plaintext highlighter-rouge">usr/bin/freebsd-dist/base.txz</code> file from the ISO.</p>

<p>The <a href="https://github.com/rpm-software-management/distribution-gpg-keys/">distribution-gpg-keys</a> repo, which contains the public keys of popular Linux distros and applications, have been packaged for a lot of the major Linux distributions, makes verification of the GPG signature easier.</p>]]></content><author><name></name></author><summary type="html"><![CDATA[Debian started signing their repository packages way back in 2007 with the release of Debian 4.0. Yet somehow we have gone backwards when it comes to validation of downloaded software in recent years.]]></summary></entry><entry><title type="html">Reducing power consumption of a desktop PC</title><link href="https://aa55.dev/2025/10/21/Desktop-low-power.html" rel="alternate" type="text/html" title="Reducing power consumption of a desktop PC" /><published>2025-10-21T05:30:00+05:30</published><updated>2025-10-21T05:30:00+05:30</updated><id>https://aa55.dev/2025/10/21/Desktop-low-power</id><content type="html" xml:base="https://aa55.dev/2025/10/21/Desktop-low-power.html"><![CDATA[<p>My current home server, a Raspberry Pi4 with 4GiB RAM is running out of memory and i wondered whether i could convert my existing desktop PC into a home server. The Pi4 with a SSD connected over USB consumes only 7.1W at idle and 9.9W at load. Before i replace the Pi with the desktop, i wanted to check if it could achieve low power consumption at idle.</p>

<h3 id="desktop-specs">Desktop specs</h3>

<ul>
  <li>AMD Ryzen 2600</li>
  <li>32GiB RAM</li>
  <li>PRIME X470-PRO</li>
  <li>RX 7700 XT</li>
  <li>Super flower LEADEX III GOLD 850W SF-850F15HG</li>
  <li>AX200 WiFi</li>
  <li>2 SATA SSDs, 1 HDD, 1 NVMe disk</li>
</ul>

<p>Power measurement was done using a cheap power meter at the power plug. The PC was measured to be idling at 65W.</p>

<h3 id="power-reduction-steps">Power reduction steps</h3>
<h4 id="leds">LEDS</h4>

<p>Turning off the RGB LEDs saved 7.6 watts</p>

<table>
  <thead>
    <tr>
      <th>LED</th>
      <th>Power saving (W)</th>
    </tr>
  </thead>
  <tbody>
    <tr>
      <td>Case fans</td>
      <td>5</td>
    </tr>
    <tr>
      <td>GPU</td>
      <td>1.8</td>
    </tr>
    <tr>
      <td>Motherboard</td>
      <td>0.8</td>
    </tr>
  </tbody>
</table>

<p>Since the Motherboard does not have an ARGB LED controller, the case fan LEDS are being driven by a <a href="https://docs.zephyrproject.org/4.2.0/boards/others/stm32_min_dev/doc/index.html">Blue Pill board</a> running USB CDC stack(so that the colours can be controlled from Linux). This board along with the large number of LEDS on the two fans explains the 5 Watts.</p>

<h4 id="usb-gadgets">USB gadgets</h4>

<p>After unplugging all the USB gadgets, including keyboard, mouse, speakers and a lamp, the power consumption is reduced by 2.2 Watts.</p>

<h4 id="fans">Fans</h4>

<p>Turning off most of the fans and reducing the CPU fan speed to the lowest value possible saves 1.8W.</p>

<h4 id="reducing-ram-clock">Reducing RAM clock</h4>

<p>There are three RAM sticks, two of 8GiB and one of 16GiB. RAM was set to run at 3200 MHz, by reducing it down to 2133 MHz and a lower voltage, we can save 4.3W.</p>

<h4 id="cpu-undervolt">CPU Undervolt</h4>

<p>CPU undervolt makes no difference in idle power, but under load(<code class="language-plaintext highlighter-rouge">stress -c 12</code>), an undervolt of 50mV saves 10W.</p>

<h4 id="pci-aspm">PCI ASPM</h4>

<p>Enabling ASPM L1 saves 8W but reduces NVMe disk read performance from 1.33 GiB/s to 1.28 GiB/s. It also causes the kernel to complain about PCIe <a href="https://docs.amd.com/r/en-US/pg213-pcie4-ultrascale-plus/Active-State-Power-Management">correctable errors</a>.</p>

<p><img src="/assets/images/desktop_power/aspm_error.png" alt="PCIe syslog error" /></p>

<h4 id="powertop-auto-tune">powertop auto tune</h4>
<p>Running <code class="language-plaintext highlighter-rouge">powertop --auto-tune</code> saves 1.6 W.</p>

<h4 id="gpu">GPU</h4>

<p>The GPU is set to low power mode by running.</p>

<figure class="highlight"><pre><code class="language-shell" data-lang="shell"><span class="nb">echo </span>low <span class="o">&gt;</span> /sys/class/drm/card0/device/power_dpm_force_performance_level</code></pre></figure>

<p>after which <code class="language-plaintext highlighter-rouge">nvtop</code> reports an idle power of 7W, down from 20W in auto mode. Disconnecting the HDMI cable saves another 2 Watts.</p>

<p>If instead, the GPU is removed, power consumption will drop by 9 Watts. The Asus motherboard can boot into Linux even without a GPU attached.</p>

<h4 id="hdd">HDD</h4>

<p>By putting the HDD into sleep, About 3-5 Watts can be saved.</p>

<h3 id="final-result">Final result</h3>

<p>After completing the above steps, idle power reduced down to 27.6W from the initial 65W. However this remains relatively high for a home server that is supposed to be idle most of the time, especially compared to the approximate 10W seen in mini PCs.</p>]]></content><author><name></name></author><summary type="html"><![CDATA[My current home server, a Raspberry Pi4 with 4GiB RAM is running out of memory and i wondered whether i could convert my existing desktop PC into a home server. The Pi4 with a SSD connected over USB consumes only 7.1W at idle and 9.9W at load. Before i replace the Pi with the desktop, i wanted to check if it could achieve low power consumption at idle.]]></summary></entry><entry><title type="html">Setting up Qt Creator for ESP32 development</title><link href="https://aa55.dev/2025/10/19/QtCreator-With_ESP-IDF.html" rel="alternate" type="text/html" title="Setting up Qt Creator for ESP32 development" /><published>2025-10-19T05:30:00+05:30</published><updated>2025-10-19T05:30:00+05:30</updated><id>https://aa55.dev/2025/10/19/QtCreator-With_ESP-IDF</id><content type="html" xml:base="https://aa55.dev/2025/10/19/QtCreator-With_ESP-IDF.html"><![CDATA[<h2 id="setup">Setup</h2>
<h3 id="step-1-installation">Step 1: Installation</h3>

<p>Install clang provided by Espressif</p>

<figure class="highlight"><pre><code class="language-shell" data-lang="shell"><span class="nb">source</span> ~/src/esp/esp-idf/export.sh
idf_tools.py <span class="nb">install </span>esp-clang</code></pre></figure>

<p>We now need to find the path to the clangd binary</p>

<figure class="highlight"><pre><code class="language-shell" data-lang="shell">which clangd</code></pre></figure>

<p>This will print the path, which should look something like<br />
<code class="language-plaintext highlighter-rouge">/home/aa55/.espressif/tools/esp-clang/esp-19.1.2_20250312/esp-clang/bin/clangd</code></p>

<h3 id="step-2-configuring-qtcreator">Step 2: Configuring QtCreator</h3>

<p>We will use Espressif’s clangd language server only while developing for ESP32, for rest of the C/C++ projects we will use the clang binaries provided by the OS distribution. To achieve this, we will clone the current settings directory and make the required modifications in this new cloned directory. While developing ESP32 projects, we will instruct QtCreator to use this directory.</p>

<p>First clone the current settings directory</p>

<figure class="highlight"><pre><code class="language-shell" data-lang="shell">rsync <span class="nt">-av</span> ~/.config/QtProject ~/.config/QtProjectESP</code></pre></figure>

<p>and then launch QtCreator with the new configuration directory</p>

<figure class="highlight"><pre><code class="language-shell" data-lang="shell">qtcreator <span class="nt">-settingspath</span> ~/.config/QtProjectESP</code></pre></figure>

<p>Open the clangd settings from <strong>Edit</strong> &gt; <strong>Preferences</strong> &gt; <strong>C++</strong> and then open the <strong>clangd</strong> tab.</p>

<p>Set the <code class="language-plaintext highlighter-rouge">Path to executable</code> field to clangd binary path from <a href="#step-1-installation">Step 1</a></p>

<p><img src="/assets/images/qtcreator_esp32/screenshot.png" alt="QtCreator settings page" /></p>

<h2 id="running-qtcreator-during-development">Running QtCreator during development</h2>

<p>To run QtCreator, we need to source the <code class="language-plaintext highlighter-rouge">export.sh</code> file inside the <code class="language-plaintext highlighter-rouge">esp-idf</code> directory and then run QtCreator from the same terminal</p>

<figure class="highlight"><pre><code class="language-shell" data-lang="shell"><span class="nb">source</span> ~/src/esp/esp-idf/export.sh
qtcreator <span class="nt">-settingspath</span> ~/.config/QtProjectESP</code></pre></figure>]]></content><author><name></name></author><summary type="html"><![CDATA[Setup Step 1: Installation]]></summary></entry><entry><title type="html">Evaluation of hashing algorithms Ascon, SHA256, SHA512 and BLAKE3 on an ARM Cortex M7 processor</title><link href="https://aa55.dev/2025/08/24/Evaluation-of-hash-algorithm.html" rel="alternate" type="text/html" title="Evaluation of hashing algorithms Ascon, SHA256, SHA512 and BLAKE3 on an ARM Cortex M7 processor" /><published>2025-08-24T05:30:00+05:30</published><updated>2025-08-24T05:30:00+05:30</updated><id>https://aa55.dev/2025/08/24/Evaluation-of-hash-algorithm</id><content type="html" xml:base="https://aa55.dev/2025/08/24/Evaluation-of-hash-algorithm.html"><![CDATA[<p>Here we evaluate the execution performance and code size of various hashing algorithms on a STM32F767 Cortex M7 processor.</p>

<h2 id="test-setup">Test setup</h2>

<p>The tests are run on a NUCLEO-F767 board which has a <a href="https://www.st.com/resource/en/datasheet/stm32f767zi.pdf">STM32F767</a> Cortex M7 processor. This processor has 512 KiB of RAM, of which 128KiB is Data Tightly Coupled Memory(DTCM)<sup id="fnref:1"><a href="#fn:1" class="footnote" rel="footnote" role="doc-noteref">1</a></sup>. The DTCM is directly connected to the core and should provide faster memory access compared to the rest of the 384KiB of SRAM. Therefore all the tests are run twice, once with the data in DTCM and then in ordinary SRAM. The tests are done with an input buffer size of 120KiB.</p>

<p>The firmware was generated using ST’s CubeMX code generator tool. The tests run on bare metal without any RTOS. The code was compiled with GCC 14.2.1 from Debian repository. The timing is measured using the <a href="https://developer.arm.com/documentation/ddi0403/d/Debug-Architecture/ARMv7-M-Debug/The-Data-Watchpoint-and-Trace-unit/CYCCNT-cycle-counter-and-related-timers?lang=en">CYCCNT</a> counter, which increments with each CPU clock cycle, enabling precise measurement of the execution time for the hash algorithm.</p>

<h3 id="algorithms-tested">Algorithms tested</h3>
<ol>
  <li>Ascon</li>
  <li>SHA256 and SHA512 from MbedTLS</li>
  <li>BLAKE3</li>
  <li>CRC32 using the hardware CRC in the microcontroller</li>
  <li>XOR of all bytes in the buffer</li>
</ol>

<h2 id="results">Results</h2>

<h3 id="built-with--os">Built with -Os</h3>

<p>The <code class="language-plaintext highlighter-rouge">armv7m</code> variant of Ascon is used and the code is built with <code class="language-plaintext highlighter-rouge">-Os</code>
<img src="/assets/images/hash_evaluation/tc1.png" alt="Plot of test case 1" /></p>

<p>From the results above, we can see that the DTCM RAM barely makes any difference in performance. BLAKE3 is the most impressive of all with performance close to that of the hardware CRC. As you will soon see, it gets even closer in the upcoming tests.</p>

<p>XOR is signifcantly slower than CRC probably because the data was processed serially, one byte at a time.</p>

<figure class="highlight"><pre><code class="language-c" data-lang="c"><span class="c1">// XOR calculation</span>
<span class="kt">uint32_t</span> <span class="n">xor</span> <span class="o">=</span> <span class="mi">0</span><span class="p">;</span>
<span class="k">for</span> <span class="p">(</span><span class="kt">size_t</span> <span class="n">i</span> <span class="o">=</span> <span class="mi">0</span><span class="p">;</span> <span class="n">i</span> <span class="o">&lt;</span> <span class="n">length</span><span class="p">;</span> <span class="n">i</span><span class="o">++</span><span class="p">)</span> <span class="p">{</span>
    <span class="n">xor</span> <span class="o">^=</span> <span class="n">buffer</span><span class="p">[</span><span class="n">i</span><span class="p">];</span>
<span class="p">}</span>

<span class="c1">// CRC calculation by ST CubeMX driver</span>
<span class="k">for</span> <span class="p">(</span><span class="n">i</span> <span class="o">=</span> <span class="mi">0U</span><span class="p">;</span> <span class="n">i</span> <span class="o">&lt;</span> <span class="p">(</span><span class="n">BufferLength</span> <span class="o">/</span> <span class="mi">4U</span><span class="p">);</span> <span class="n">i</span><span class="o">++</span><span class="p">)</span>
<span class="p">{</span>
    <span class="n">hcrc</span><span class="o">-&gt;</span><span class="n">Instance</span><span class="o">-&gt;</span><span class="n">DR</span> <span class="o">=</span> <span class="p">((</span><span class="kt">uint32_t</span><span class="p">)</span><span class="n">pBuffer</span><span class="p">[</span><span class="mi">4U</span> <span class="o">*</span> <span class="n">i</span><span class="p">]</span> <span class="o">&lt;&lt;</span> <span class="mi">24U</span><span class="p">)</span> <span class="o">|</span> \
                        <span class="p">((</span><span class="kt">uint32_t</span><span class="p">)</span><span class="n">pBuffer</span><span class="p">[(</span><span class="mi">4U</span> <span class="o">*</span> <span class="n">i</span><span class="p">)</span> <span class="o">+</span> <span class="mi">1U</span><span class="p">]</span> <span class="o">&lt;&lt;</span> <span class="mi">16U</span><span class="p">)</span> <span class="o">|</span> \
                        <span class="p">((</span><span class="kt">uint32_t</span><span class="p">)</span><span class="n">pBuffer</span><span class="p">[(</span><span class="mi">4U</span> <span class="o">*</span> <span class="n">i</span><span class="p">)</span> <span class="o">+</span> <span class="mi">2U</span><span class="p">]</span> <span class="o">&lt;&lt;</span> <span class="mi">8U</span><span class="p">)</span>  <span class="o">|</span> \
                        <span class="p">(</span><span class="kt">uint32_t</span><span class="p">)</span><span class="n">pBuffer</span><span class="p">[(</span><span class="mi">4U</span> <span class="o">*</span> <span class="n">i</span><span class="p">)</span> <span class="o">+</span> <span class="mi">3U</span><span class="p">];</span>
<span class="p">}</span></code></pre></figure>

<h3 id="built-with--o3">Built with -O3</h3>

<p>This test is similar to above, but with optimization flag set to level 3
<img src="/assets/images/hash_evaluation/tc2.png" alt="Plot of test case 2" /></p>

<h3 id="ascon-variants">Ascon variants</h3>

<p>Here we test the different variants of Ascon. Code is compiled with <code class="language-plaintext highlighter-rouge">-Os</code> for all the tests.
<img src="/assets/images/hash_evaluation/tc3.png" alt="Plot of test case 3" /></p>

<h3 id="prefetch-and-caching">Prefetch and caching</h3>

<p>We test the effects of enabling the following</p>

<ol>
  <li>Adaptive realtime accelerator (ART)</li>
  <li>CPU Instruction cache</li>
  <li>CPU Data cache</li>
</ol>

<p>The <code class="language-plaintext highlighter-rouge">armv7m_small</code> variant of Ascon is used and the code is built with <code class="language-plaintext highlighter-rouge">-Os</code>. The buffer is stored in DTCM RAM.</p>

<p><img src="/assets/images/hash_evaluation/tc4.png" alt="Plot of test case 4" /></p>

<h3 id="clock-speeds">Clock speeds</h3>

<p>We measure the time taken across different CPU clock speeds (HCLK). The <code class="language-plaintext highlighter-rouge">armv7m_small</code> variant of Ascon is used and the code is built with <code class="language-plaintext highlighter-rouge">-Os</code>. The buffer is stored in DTCM RAM.</p>

<p><img src="/assets/images/hash_evaluation/tc5.png" alt="Plot of test case 5" /></p>

<h3 id="flash-size">Flash size</h3>

<p>Here we measure the binary size of the various algorithms. The code is compiled with  <code class="language-plaintext highlighter-rouge">-Os</code> and <code class="language-plaintext highlighter-rouge">-flto</code></p>

<p><img src="/assets/images/hash_evaluation/tc6.png" alt="Plot of test case 6" /></p>

<hr />

<div class="footnotes" role="doc-endnotes">
  <ol>
    <li id="fn:1">
      <p><a href="https://www.st.com/resource/en/application_note/dm00169764-stm32f7-series-system-architecture-and-performance-stmicroelectronics.pdf">AN4667 </a> <a href="#fnref:1" class="reversefootnote" role="doc-backlink">&#8617;</a></p>
    </li>
  </ol>
</div>]]></content><author><name></name></author><summary type="html"><![CDATA[Here we evaluate the execution performance and code size of various hashing algorithms on a STM32F767 Cortex M7 processor.]]></summary></entry><entry><title type="html">Optimizing factorio startup performance when running on a hard disk</title><link href="https://aa55.dev/2025/06/08/Improve-factorio-startup-speed.html" rel="alternate" type="text/html" title="Optimizing factorio startup performance when running on a hard disk" /><published>2025-06-08T05:30:00+05:30</published><updated>2025-06-08T05:30:00+05:30</updated><id>https://aa55.dev/2025/06/08/Improve-factorio-startup-speed</id><content type="html" xml:base="https://aa55.dev/2025/06/08/Improve-factorio-startup-speed.html"><![CDATA[<p>While my Operating System is installed on a SSD, i install games like Factorio on my HDD. When running on a hard disk, Factorio takes a long time to startup and show the main menu. A significant percentage of that time is spent on IO, reading the game assets from the slow hard disk.</p>

<p>To improve this, we could implement a script that will run at system bootup which will cache all the game assets to RAM. The Factorio game directory is only 4.5 GiB in size and therefore would easily fit in my PC’s 32 GiB RAM.</p>

<h3 id="results">Results</h3>

<p>Before the optimization, the game took 113 seconds to startup<sup id="fnref:1"><a href="#fn:1" class="footnote" rel="footnote" role="doc-noteref">1</a></sup>. After the optimization, the game only took 30 seconds. The script takes 230 seconds to run, much higher than the time taken for the game to load probably because the game only loads parts of the files whereas the script always loads the entire file contents into RAM.</p>

<h3 id="steps">Steps</h3>
<p>We need to first get the list of all files read by the game at startup. This can be done with the help of inotify. Install the inotify tools packages:</p>

<figure class="highlight"><pre><code class="language-shell" data-lang="shell"><span class="nb">sudo </span>apt <span class="nb">install </span>inotify-tools</code></pre></figure>

<p>This package provides the <code class="language-plaintext highlighter-rouge">inotifywait</code> program which can print out the name of file when its accessed by any process in the system. Find out the path to the directory where the game is downloaded and then run the following command.</p>

<figure class="highlight"><pre><code class="language-shell" data-lang="shell">inotifywait <span class="nt">-e</span> access <span class="nt">-r</span> <span class="nt">-m</span> ~/path-to-game/steamapps/common/Factorio <span class="se">\</span>
<span class="nt">--format</span><span class="o">=</span><span class="s1">'%w%f %e'</span> <span class="nt">--outfile</span> ~/trace.log</code></pre></figure>

<p>A custom format is set with <code class="language-plaintext highlighter-rouge">--format='%w%f %e'</code>. This is necessary because <code class="language-plaintext highlighter-rouge">inotifywait</code> will print the names of both files and directories and we are only interested in files. The <code class="language-plaintext highlighter-rouge">%e</code> will print <code class="language-plaintext highlighter-rouge">ACCESS,ISDIR</code> for directory and <code class="language-plaintext highlighter-rouge">ACCESS</code> for files. We will later use <code class="language-plaintext highlighter-rouge">grep</code> to remove the directory names from the list.</p>

<p>Run the above command on a terminal and launch the game. Wait for the game to startup and show the main menu and then exit the game and finally terminate the above command with  <code class="language-plaintext highlighter-rouge">CTRL-C</code>. The list of files would then be stored in <code class="language-plaintext highlighter-rouge">~/trace.log</code></p>

<p>This file contains a list of both files and directories. We can filter out directories by running the following:</p>

<figure class="highlight"><pre><code class="language-shell" data-lang="shell"><span class="nb">cat</span> ~/trace.log <span class="se">\</span>
| <span class="nb">grep</span> <span class="nt">-v</span> <span class="s1">'ACCESS,ISDIR'</span> <span class="se">\</span>
| rev | <span class="nb">cut</span> <span class="nt">-d</span> <span class="s1">' '</span> <span class="nt">-f</span> 2-| rev <span class="o">&gt;</span> ~/.local/share/preload.list</code></pre></figure>

<p>We first use <code class="language-plaintext highlighter-rouge">grep</code> to remove directory names and then we remove the <code class="language-plaintext highlighter-rouge">ACCESS</code> string from the end using <code class="language-plaintext highlighter-rouge">rev</code> and <code class="language-plaintext highlighter-rouge">cut</code>.</p>

<p>We now have the list of files in <code class="language-plaintext highlighter-rouge">preload.list</code>. what we need to do next is to load the file contents into RAM at system bootup. For this we need a one liner script which needs to be saved to <code class="language-plaintext highlighter-rouge">~/.local/share/preload_factorio.sh</code></p>

<figure class="highlight"><pre><code class="language-shell" data-lang="shell"><span class="c">#!/bin/bash</span>
<span class="k">while </span><span class="nb">read </span>i<span class="p">;</span> <span class="k">do </span><span class="nb">cat</span> <span class="s2">"</span><span class="nv">$i</span><span class="s2">"</span> <span class="o">&gt;</span> /dev/null<span class="p">;</span><span class="k">done</span> &lt; ~/.local/share/preload.list</code></pre></figure>

<p>Create a systemd service file in <code class="language-plaintext highlighter-rouge">~/.config/systemd/user/factorio_preload.service</code> to run this script upon login.</p>

<figure class="highlight"><pre><code class="language-systemd" data-lang="systemd"><span class="k">[Unit]</span>
<span class="nt">Description</span><span class="p">=</span>Preload factorio game assets

<span class="k">[Service]</span>
<span class="nt">Type</span><span class="p">=</span>oneshot
<span class="nt">ExecStart</span><span class="p">=</span>/bin/bash %h/.local/share/preload_factorio.sh
<span class="nt">IOWeight</span><span class="p">=</span>1

<span class="k">[Install]</span>
<span class="nt">WantedBy</span><span class="p">=</span>default.target</code></pre></figure>

<p>Activate the above service by running</p>

<figure class="highlight"><pre><code class="language-shell" data-lang="shell">systemctl <span class="nt">--user</span> <span class="nb">enable </span>factorio_preload.service</code></pre></figure>

<p>From now on Factorio game assets will be loaded to RAM upon system bootup.</p>

<p>Note: Before you measure the time taken to load the game assets, you need to clear the cache by running:</p>

<figure class="highlight"><pre><code class="language-shell" data-lang="shell"><span class="nb">echo </span>3 <span class="o">&gt;</span> /proc/sys/vm/drop_caches</code></pre></figure>

<div class="footnotes" role="doc-endnotes">
  <ol>
    <li id="fn:1">
      <p>startup time is measured as the time taken for the game main menu to show up after clicking the launch button on Steam. <a href="#fnref:1" class="reversefootnote" role="doc-backlink">&#8617;</a></p>
    </li>
  </ol>
</div>]]></content><author><name></name></author><summary type="html"><![CDATA[While my Operating System is installed on a SSD, i install games like Factorio on my HDD. When running on a hard disk, Factorio takes a long time to startup and show the main menu. A significant percentage of that time is spent on IO, reading the game assets from the slow hard disk.]]></summary></entry><entry><title type="html">The essential beginners guide to Linux</title><link href="https://aa55.dev/2025/02/06/Essential-Linux-beginners-guide.html" rel="alternate" type="text/html" title="The essential beginners guide to Linux" /><published>2025-02-06T05:30:00+05:30</published><updated>2025-02-06T05:30:00+05:30</updated><id>https://aa55.dev/2025/02/06/Essential-Linux-beginners-guide</id><content type="html" xml:base="https://aa55.dev/2025/02/06/Essential-Linux-beginners-guide.html"><![CDATA[<p>If you are someone new to Linux i hope the following will help you out. This guide assumes you are running on Debian(or a Debian derivative)</p>

<ol id="markdown-toc">
  <li><a href="#backup" id="markdown-toc-backup">Backup</a></li>
  <li><a href="#automatic-software-updates" id="markdown-toc-automatic-software-updates">Automatic software updates</a></li>
  <li><a href="#cache-your-debian-package-downloads" id="markdown-toc-cache-your-debian-package-downloads">Cache your debian package downloads</a></li>
  <li><a href="#avoid-having-to-use-sudo-on-every-command" id="markdown-toc-avoid-having-to-use-sudo-on-every-command">Avoid having to use sudo on every command</a></li>
  <li><a href="#syntax-highlighting-text-files" id="markdown-toc-syntax-highlighting-text-files">Syntax highlighting text files</a></li>
  <li><a href="#add-colors-to-log-files" id="markdown-toc-add-colors-to-log-files">Add colors to log files</a></li>
  <li><a href="#run-command-when-file-contents-changes" id="markdown-toc-run-command-when-file-contents-changes">Run command when file contents changes</a></li>
  <li><a href="#put-your-computer-to-sleep-and-auto-wakeup-on-timer" id="markdown-toc-put-your-computer-to-sleep-and-auto-wakeup-on-timer">Put your computer to sleep and auto wakeup on timer</a></li>
  <li><a href="#monitoring-thermals" id="markdown-toc-monitoring-thermals">Monitoring thermals</a></li>
  <li><a href="#set-your-amd-gpu-to-low-power-mode" id="markdown-toc-set-your-amd-gpu-to-low-power-mode">Set your AMD GPU to low power mode.</a></li>
  <li><a href="#monitor-ping-latency-and-packet-loss" id="markdown-toc-monitor-ping-latency-and-packet-loss">Monitor ping latency and packet loss</a></li>
  <li><a href="#find-and-remove-duplicate-files" id="markdown-toc-find-and-remove-duplicate-files">Find and remove duplicate files</a></li>
  <li><a href="#protect-your-computer-from-random-untrusted-usb-devices" id="markdown-toc-protect-your-computer-from-random-untrusted-usb-devices">Protect your computer from random untrusted USB devices</a></li>
  <li><a href="#show-data-transfer-progress" id="markdown-toc-show-data-transfer-progress">Show data transfer progress</a></li>
  <li><a href="#get-notifications-on-your-phone" id="markdown-toc-get-notifications-on-your-phone">Get notifications on your phone</a></li>
  <li><a href="#extract-files-from-any-binary" id="markdown-toc-extract-files-from-any-binary">Extract files from any binary</a></li>
  <li><a href="#detect-file-corruption" id="markdown-toc-detect-file-corruption">Detect file corruption</a></li>
  <li><a href="#download-more-ram" id="markdown-toc-download-more-ram">Download more RAM</a></li>
  <li><a href="#benchmarking-applications" id="markdown-toc-benchmarking-applications">Benchmarking applications</a></li>
  <li><a href="#find-which-package-provides-a-file" id="markdown-toc-find-which-package-provides-a-file">Find which package provides a file</a></li>
  <li><a href="#faster-compression-with-zstd" id="markdown-toc-faster-compression-with-zstd">Faster compression with zstd</a></li>
  <li><a href="#faster-checksum-with-b3sum-and-xxh" id="markdown-toc-faster-checksum-with-b3sum-and-xxh">Faster checksum with b3sum and xxh</a></li>
  <li><a href="#managing-your-linux-system-on-a-browser" id="markdown-toc-managing-your-linux-system-on-a-browser">Managing your Linux system on a browser</a></li>
  <li><a href="#run-virtual-machines" id="markdown-toc-run-virtual-machines">Run virtual machines</a></li>
  <li><a href="#run-containers-with-systemd" id="markdown-toc-run-containers-with-systemd">Run containers with systemd</a></li>
  <li><a href="#run-debian-everywhere" id="markdown-toc-run-debian-everywhere">Run debian everywhere</a></li>
  <li><a href="#optimize-bootup-speed" id="markdown-toc-optimize-bootup-speed">Optimize bootup speed</a></li>
  <li><a href="#prevent-system-from-going-to-sleep" id="markdown-toc-prevent-system-from-going-to-sleep">Prevent system from going to sleep</a></li>
  <li><a href="#run-a-process-with-low-priority" id="markdown-toc-run-a-process-with-low-priority">Run a process with low priority</a></li>
  <li><a href="#authenticate-once-open-multiple-ssh-sessions" id="markdown-toc-authenticate-once-open-multiple-ssh-sessions">Authenticate once, open multiple SSH sessions</a></li>
  <li><a href="#restrict-ssh-key-to-only-run-a-single-command" id="markdown-toc-restrict-ssh-key-to-only-run-a-single-command">Restrict SSH key to only run a single command</a></li>
  <li><a href="#mount-remote-server-locally-over-ssh" id="markdown-toc-mount-remote-server-locally-over-ssh">Mount remote server locally over SSH</a></li>
  <li><a href="#monitor-resource-contention" id="markdown-toc-monitor-resource-contention">Monitor resource contention</a></li>
  <li><a href="#control-cpu-governor" id="markdown-toc-control-cpu-governor">Control CPU governor</a></li>
  <li><a href="#bind-mounting" id="markdown-toc-bind-mounting">Bind mounting</a></li>
  <li><a href="#reduce-reserved-blocks-in-ext4-filesystem" id="markdown-toc-reduce-reserved-blocks-in-ext4-filesystem">Reduce reserved blocks in ext4 filesystem</a></li>
  <li><a href="#access-cloud-storage-from-the-terminal" id="markdown-toc-access-cloud-storage-from-the-terminal">Access cloud storage from the terminal</a></li>
  <li><a href="#prevent-critical-files-from-accidental-deletion" id="markdown-toc-prevent-critical-files-from-accidental-deletion">Prevent critical files from accidental deletion</a></li>
  <li><a href="#monitor-files-accessed-by-the-system" id="markdown-toc-monitor-files-accessed-by-the-system">Monitor files accessed by the system</a></li>
  <li><a href="#avoid-frequent-password-authentication" id="markdown-toc-avoid-frequent-password-authentication">Avoid frequent password authentication</a></li>
  <li><a href="#use-1271-instead-of-127001" id="markdown-toc-use-1271-instead-of-127001">Use 127.1 instead of 127.0.0.1</a></li>
  <li><a href="#recovering-from-server-running-out-of-disk-space" id="markdown-toc-recovering-from-server-running-out-of-disk-space">Recovering from server running out of disk space</a></li>
  <li><a href="#reduce-memory-usage-when-running-multiple-vms" id="markdown-toc-reduce-memory-usage-when-running-multiple-vms">Reduce memory usage when running multiple VMs</a></li>
  <li><a href="#remove-packages-with-apt-by-appending-a--" id="markdown-toc-remove-packages-with-apt-by-appending-a--">Remove packages with apt by appending a “-“</a></li>
  <li><a href="#adding-third-party-repositories-with-extrepo" id="markdown-toc-adding-third-party-repositories-with-extrepo">Adding third party repositories with extrepo</a></li>
</ol>

<h3 id="backup">Backup</h3>

<p>If you are new to Linux, backups are the first thing you need to setup. Speaking from experience, it is only a matter of time before you run a wrong command and completely wipe all your data. Make sure your backups are stored on another machine since a common mistake most people(beginners and experts alike) make is to accidentally run a command on the wrong hard disk. You should also validate your backups from time to time. Unvalidated backups are the same as no backups.</p>

<p>As of now <a href="https://www.borgbackup.org/">BorgBackup</a> is simply the best backup tool for Linux. It can compress and de-duplicate your data which lets you backup your data every day without your backup server running out of disk space. Borg can encrypt your data on the client side so your cloud provider will never be able to read your files.</p>

<p>Do not backup to a cifs mount, there is a known <a href="https://github.com/borgbackup/borg/issues/8409">bug</a> that will lead to data corruption. Always use SSH for backup.</p>

<p>Make use of the <a href="https://borgbackup.readthedocs.io/en/stable/usage/general.html#environment-variables">BORG_PASSCOMMAND</a> environment variable to not have to type in your password every time you need to access the borg repository.</p>

<p>If you want to avoid temporary files from being backed up, you have two options:</p>
<ol>
  <li>Use the <code class="language-plaintext highlighter-rouge">--exclude-from FILE</code> and list out each and every directory to be excluded in this file</li>
  <li>Use the <code class="language-plaintext highlighter-rouge">--exclude-caches</code> option. This will exclude every directory with a <a href="https://bford.info/cachedir/">CACHEDIR.TAG</a> file. You can place this inside the directory you want to be excluded. Some tools like ccache and cargo will place a <code class="language-plaintext highlighter-rouge">CACHEDIR.TAG</code> file inside their cache directory.</li>
</ol>

<p>Care must be taken while backing up files from software like virtual machines, containers or databases. All of these should be shutdown before starting the backup process. If your backup takes a long time and you cannot have the server be down for so long, you should probably look into <a href="https://wiki.archlinux.org/title/Btrfs">btrfs snapshots</a>.</p>

<p>Borg is best combined with <a href="https://github.com/borgmatic-collective/borgmatic">borgmatic</a>. With borgmatic you can avoid having to write a script to backup, check, prune and compact the repository. With the help of <a href="https://github.com/caronc/apprise">apprise</a> tool, borgmatic can be setup to send you a notification if any backup operation fails.</p>

<p>If you have disk encryption enabled you need to backup your LUKS header. Refer to <a href="https://docs.fedoraproject.org/en-US/quick-docs/encrypting-drives-using-LUKS/#_backup_luks_headers">Fedora docs</a> or <a href="https://wiki.archlinux.org/title/Dm-crypt/Device_encryption#Backup_and_restore">Arch Wiki</a></p>

<h3 id="automatic-software-updates">Automatic software updates</h3>

<p>Backups and security have a lot in common, by the time you realize you needed it, its too late.</p>

<p><code class="language-plaintext highlighter-rouge">unattended-upgrades</code> package will automatically install security updates on Debian (and debian derivatives like Ubuntu). While it is rare for a Debian security update to break the system, it can still happen. On a critical production server you should not have auto updates installed, instead you should subscribe to the <a href="https://www.debian.org/security/">Debian security advisory</a>, test out new updated packages and then manually push out the updates to production server. If you do not have such a process in place, it is better off to enable auto updates.</p>

<p>After installing the <code class="language-plaintext highlighter-rouge">unattended-upgrades</code> package, activate auto updates by running</p>

<p><code class="language-plaintext highlighter-rouge">sudo dpkg-reconfigure unattended-upgrades</code></p>

<p>If you are running a server you will need to modify the <code class="language-plaintext highlighter-rouge">/etc/apt/apt.conf.d/50unattended-upgrades</code> file to enable auto reboot after a security update. Modify the following three lines as per your requirement:</p>

<figure class="highlight"><pre><code class="language-conf" data-lang="conf"><span class="n">Unattended</span>-<span class="n">Upgrade</span>::<span class="n">Automatic</span>-<span class="n">Reboot</span> <span class="s2">"true"</span>;
<span class="n">Unattended</span>-<span class="n">Upgrade</span>::<span class="n">Automatic</span>-<span class="n">Reboot</span>-<span class="n">WithUsers</span> <span class="s2">"true"</span>;
<span class="n">Unattended</span>-<span class="n">Upgrade</span>::<span class="n">Automatic</span>-<span class="n">Reboot</span>-<span class="n">Time</span> <span class="s2">"now"</span>;</code></pre></figure>

<h3 id="cache-your-debian-package-downloads">Cache your debian package downloads</h3>

<p>If you have many Debian servers or containers, it might make sense to cache your apt downloads with <code class="language-plaintext highlighter-rouge">apt-cacher-ng</code>. With this, your apt downloads will now work at the speed of your LAN/server rather than your internet/Debian mirror speed.</p>

<p>Setup is easy, install the <code class="language-plaintext highlighter-rouge">apt-cacher-ng</code> package on your server and point all your clients to use it by creating a config file in <code class="language-plaintext highlighter-rouge">/etc/apt/apt.conf.d/</code> by running:</p>

<figure class="highlight"><pre><code class="language-shell" data-lang="shell"><span class="nb">echo</span> <span class="s1">'Acquire::http { Proxy "http://SERVER_IP:3142"; }'</span> <span class="o">&gt;</span> /etc/apt/apt.conf.d/proxy</code></pre></figure>

<p>Note: If you encounter a <code class="language-plaintext highlighter-rouge">The following signatures were invalid: BADSIG 648ACFD622F3D138 Debian Archive Automatic Signing Key</code> error on the client, you will need to apply the workaround in <a href="https://bugs.debian.org/cgi-bin/bugreport.cgi?bug=1003865#81">this comment</a></p>

<p>For some third party repositories you might want to bypass the proxy. You can achieve this by adding the following line to your proxy config files.</p>

<figure class="highlight"><pre><code class="language-shell" data-lang="shell">Acquire::HTTP::Proxy::example.com <span class="s2">"DIRECT"</span><span class="p">;</span></code></pre></figure>

<h3 id="avoid-having-to-use-sudo-on-every-command">Avoid having to use sudo on every command</h3>

<p>You can get a root shell with <code class="language-plaintext highlighter-rouge">sudo -i</code> and can avoid having to prepend <code class="language-plaintext highlighter-rouge">sudo</code> on every command</p>

<h3 id="syntax-highlighting-text-files">Syntax highlighting text files</h3>

<p>Install the <code class="language-plaintext highlighter-rouge">bat</code> package and use <code class="language-plaintext highlighter-rouge">batcat</code> instead of <code class="language-plaintext highlighter-rouge">cat</code> to syntax highlight text files. Another option is the <code class="language-plaintext highlighter-rouge">python3-pygments</code> package and running <code class="language-plaintext highlighter-rouge">pygmentize -g FILE</code></p>

<h3 id="add-colors-to-log-files">Add colors to log files</h3>

<p>Use <code class="language-plaintext highlighter-rouge">ccze</code> to add colors to your log files</p>

<figure class="highlight"><pre><code class="language-shell" data-lang="shell">ccze <span class="nt">-A</span> &lt; /var/log/dpkg.log</code></pre></figure>

<h3 id="run-command-when-file-contents-changes">Run command when file contents changes</h3>

<p>The <code class="language-plaintext highlighter-rouge">entr</code> program can be used to run a command when a file changes</p>

<figure class="highlight"><pre><code class="language-shell" data-lang="shell"><span class="nb">echo </span>test.py | entr python3 test.py</code></pre></figure>

<p>Now when you save the python file on your text editor, <code class="language-plaintext highlighter-rouge">entr</code> will run the python script</p>

<h3 id="put-your-computer-to-sleep-and-auto-wakeup-on-timer">Put your computer to sleep and auto wakeup on timer</h3>

<p><code class="language-plaintext highlighter-rouge">rtcwake</code> can be used to put your computer to sleep and wakeup on a set time. This requires your computer to have a RTC (which even 15 year old computers would have but not SBCs like the raspberry pi). This is particularly of interest to home servers where this command can be used to shutdown the server to save power at night or when you are not at home.</p>

<figure class="highlight"><pre><code class="language-shell" data-lang="shell">rtcwake <span class="nt">-m</span> mem <span class="nt">-s</span> 60</code></pre></figure>

<p>The above command will put your computer to sleep and wakeup after 60 seconds.</p>

<h3 id="monitoring-thermals">Monitoring thermals</h3>

<p>Install the <code class="language-plaintext highlighter-rouge">lm-sensors</code> package and run <code class="language-plaintext highlighter-rouge">sensors-detect</code> to detect the hardware. You can then monitor your system with <code class="language-plaintext highlighter-rouge">sensors</code> command. Run <code class="language-plaintext highlighter-rouge">watch -d sensors</code> to keep running the command every 2s. The <code class="language-plaintext highlighter-rouge">-d</code> parameter will highlight any changes.</p>

<p>Note that while reading the CPU and GPU information is safe, some BIOS are buggy and just repeatedly reading the temperature alone might trigger bugs in the BIOS. On my Asus motherboard, <code class="language-plaintext highlighter-rouge">sensors</code> command sometimes makes the fans to stop responding to temperature changes or even invert the fan speed control (spinning at full speed on low temperatures and spinning at lower speed when temperature increases)</p>

<h3 id="set-your-amd-gpu-to-low-power-mode">Set your AMD GPU to low power mode.</h3>

<p>Unless you are gaming or need your GPU for computation, putting your GPU to low power mode will prevent it from heating up on load and spinning up the GPU fans. You will need to create a systemd init service that runs the following command:</p>

<figure class="highlight"><pre><code class="language-shell" data-lang="shell"><span class="nb">echo </span>low <span class="o">&gt;</span> /sys/class/drm/card0/device/power_dpm_force_performance_level</code></pre></figure>

<h3 id="monitor-ping-latency-and-packet-loss">Monitor ping latency and packet loss</h3>

<p>Use <code class="language-plaintext highlighter-rouge">mtr</code> to monitor ping latency and packet loss</p>

<figure class="highlight"><pre><code class="language-shell" data-lang="shell">mtr <span class="nt">-t</span> 8.8.8.8</code></pre></figure>

<p>The <code class="language-plaintext highlighter-rouge">-t</code> parameter is to force it to use the terminal and not to pop open a GUI window.</p>

<h3 id="find-and-remove-duplicate-files">Find and remove duplicate files</h3>

<p><code class="language-plaintext highlighter-rouge">fdupes -dN mydir</code></p>

<p>This command will remove all duplicate files in the <code class="language-plaintext highlighter-rouge">mydir</code> directory</p>

<h3 id="protect-your-computer-from-random-untrusted-usb-devices">Protect your computer from random untrusted USB devices</h3>

<p>With <a href="https://usbguard.github.io/documentation/configuration.html">USBGuard</a> you can restrict what USB devices can be connected to your computer.</p>

<h3 id="show-data-transfer-progress">Show data transfer progress</h3>

<p>Add <code class="language-plaintext highlighter-rouge">pv</code> to your pipe to see progress and data transfer rate.</p>

<figure class="highlight"><pre><code class="language-shell" data-lang="shell">pv src.tar  | zstdmt <span class="o">&gt;</span> src.tar.zst</code></pre></figure>

<p>You can also have multiple instances of <code class="language-plaintext highlighter-rouge">pv</code> by using the cursor and name options</p>

<figure class="highlight"><pre><code class="language-shell" data-lang="shell"><span class="nb">tar </span>c mydir | pv <span class="nt">-cN</span> <span class="s1">'pre zstd'</span> | zstdmt | pv <span class="nt">-cN</span> <span class="s1">'post zstd'</span> <span class="o">&gt;</span> test.tar.zst</code></pre></figure>

<p><code class="language-plaintext highlighter-rouge">pv</code> can also rate limit data transfer with the <code class="language-plaintext highlighter-rouge">-L</code> option</p>

<h3 id="get-notifications-on-your-phone">Get notifications on your phone</h3>

<p><code class="language-plaintext highlighter-rouge">apprise</code> can be used to send messages to a large list of <a href="https://github.com/caronc/apprise">providers</a>. For instance, add this to the <code class="language-plaintext highlighter-rouge">on_error</code> hook of borgmatic and get notified when backup fails.</p>

<figure class="highlight"><pre><code class="language-shell" data-lang="shell">apprise  <span class="nt">-t</span> <span class="s1">'server1'</span> <span class="nt">-b</span> <span class="s1">'Backup failed'</span> <span class="nt">-c</span> /etc/apprise.config</code></pre></figure>

<h3 id="extract-files-from-any-binary">Extract files from any binary</h3>

<p>The <code class="language-plaintext highlighter-rouge">binwalk</code> tool can extract files from any binary file. This is particularly useful on firmware binary files.</p>

<h3 id="detect-file-corruption">Detect file corruption</h3>

<p>Use <code class="language-plaintext highlighter-rouge">hashdeep</code> tool to calculate a checksum file and then use it to ensure files have not been modified.</p>

<p>Create the checksum file by running</p>

<figure class="highlight"><pre><code class="language-shell" data-lang="shell">hashdeep <span class="nt">-r</span> Downloads/ <span class="o">&gt;</span> checksum</code></pre></figure>

<p>and now verify integrity by running.</p>

<figure class="highlight"><pre><code class="language-shell" data-lang="shell">hashdeep <span class="nt">-ak</span> checksum <span class="nt">-r</span> Downloads/</code></pre></figure>

<h3 id="download-more-ram">Download more RAM</h3>
<p>Install the <code class="language-plaintext highlighter-rouge">zram-tools</code> package and it will setup swap on a zram compressed ram disk. When needed the kernel will compress memory contents and swap out to zram. This approach is effective because in most cases memory contents can be easily compressed. The time required to compress and decompress memory would be lower than reaching out to the hard drive.</p>

<p>Once installed you can see how much of the zram is being used by running the <code class="language-plaintext highlighter-rouge">zramctl</code> command.</p>

<figure class="highlight"><pre><code class="language-shell" data-lang="shell">NAME       ALGORITHM DISKSIZE  DATA COMPR TOTAL STREAMS MOUNTPOINT
/dev/zram0 lz4          15.6G  4.6G  1.1G  1.3G      12 <span class="o">[</span>SWAP]</code></pre></figure>

<p>Here 15.6 GiB of RAM was allotted for zram. Presently 4.6 GiB of RAM was compressed down into 1.1GiB before being stored in zram.</p>

<h3 id="benchmarking-applications">Benchmarking applications</h3>

<p>To accurately benchmark an application that reads files from the hard disk, the cache memory needs to be cleared before the program is executed. Run <code class="language-plaintext highlighter-rouge">echo 3 &gt; /proc/sys/vm/drop_caches</code> to drop kernel cache memory.</p>

<h3 id="find-which-package-provides-a-file">Find which package provides a file</h3>

<p>With the <code class="language-plaintext highlighter-rouge">apt-file</code> package you can find out which package provides a file. After installation, run <code class="language-plaintext highlighter-rouge">apt-file update</code> once and it is ready for use.</p>

<figure class="highlight"><pre><code class="language-shell" data-lang="shell">~<span class="nv">$ </span>apt-file search kvm-ok
Searching through filenames ...           
cpu-checker: /usr/sbin/kvm-ok  
cpu-checker: /usr/share/man/man1/kvm-ok.1.gz</code></pre></figure>

<h3 id="faster-compression-with-zstd">Faster compression with zstd</h3>

<p>If you need to share files with Windows or MacOS users, compress them with zip. For everything else use zstd. You will get compression close to gzip but at fraction of the time. <code class="language-plaintext highlighter-rouge">zstd</code> package provides the multi threaded <code class="language-plaintext highlighter-rouge">zstdmt</code> command which will use all your CPU cores for compression.</p>

<h3 id="faster-checksum-with-b3sum-and-xxh">Faster checksum with b3sum and xxh</h3>

<p><code class="language-plaintext highlighter-rouge">b3sum</code> is a much faster alternative to <code class="language-plaintext highlighter-rouge">SHA256</code>. On a raspberry PI 4, <code class="language-plaintext highlighter-rouge">b3sum</code> can be more than 8 times faster than SHA256. Similarly <code class="language-plaintext highlighter-rouge">xxhash</code> can be used instead of CRC32.</p>

<h3 id="managing-your-linux-system-on-a-browser">Managing your Linux system on a browser</h3>

<p>Manage your Linux machine via a web browser with <a href="https://cockpit-project.org/">Cockpit</a>. Install the <code class="language-plaintext highlighter-rouge">cockpit</code> package and head over to http://localhost:9090/.</p>

<h3 id="run-virtual-machines">Run virtual machines</h3>

<p>You can run virtual machines with <a href="https://wiki.debian.org/libvirt">libvirt</a>. First make sure hardware virtualization is enabled by installing the <code class="language-plaintext highlighter-rouge">cpu-checker</code> package and running <code class="language-plaintext highlighter-rouge">kvm-ok</code> command. It should show the following output, if not check your BIOS manual on how to enable it.</p>

<figure class="highlight"><pre><code class="language-shell" data-lang="shell"><span class="nv">$ </span>/usr/sbin/kvm-ok
INFO: /dev/kvm exists
KVM acceleration can be used</code></pre></figure>

<p>Install <code class="language-plaintext highlighter-rouge">libvirt-daemon-system</code> and the GUI <code class="language-plaintext highlighter-rouge">virt-manager</code> package. Add your user account to the <code class="language-plaintext highlighter-rouge">libvirt</code> group or you may get authentication errors.</p>

<figure class="highlight"><pre><code class="language-shell" data-lang="shell">usermod <span class="nt">-a</span> <span class="nt">-G</span> libvirt USERNAME</code></pre></figure>

<p>Launch the “Virtual Machine Manager” application to run your VM. This application can also remotely connect over SSH to other machines and manage virtual machines running on it. You can run VMs using this even on a raspberry PI, provided you have enough memory.</p>

<p>The <code class="language-plaintext highlighter-rouge">guestfs-tools</code> package provides a lot of useful tools like <a href="https://man.archlinux.org/man/virt-customize.1">virt-customize</a>, <a href="https://man.archlinux.org/man/extra/guestfs-tools/virt-sparsify.1">virt-sparsify</a> and <a href="https://man.archlinux.org/man/extra/guestfs-tools/virt-sysprep.1">virt-sysprep</a>. Make sure your VM is shutdown before running these tools.</p>

<p>Consult the <a href="https://wiki.archlinux.org/title/Libvirt">ArchWiki</a> for more information.</p>

<h3 id="run-containers-with-systemd">Run containers with systemd</h3>

<p>Install the <code class="language-plaintext highlighter-rouge">systemd-container</code> package to install the tools necessary for managing the containers and <code class="language-plaintext highlighter-rouge">debootstrap</code> for generating container images.</p>

<p>Generate a container image with:</p>

<figure class="highlight"><pre><code class="language-shell" data-lang="shell">debootstrap <span class="nt">--force-check-gpg</span> <span class="nt">--include</span><span class="o">=</span>dbus,systemd stable debian</code></pre></figure>

<p>The <code class="language-plaintext highlighter-rouge">systemd</code> and <code class="language-plaintext highlighter-rouge">dbus</code> packages are mandatory if you need to manage the container with systemd tools.</p>

<p>Now move the container over to <code class="language-plaintext highlighter-rouge">/var/lib/machines</code></p>

<figure class="highlight"><pre><code class="language-shell" data-lang="shell"><span class="nb">mv </span>debian /var/lib/machines/</code></pre></figure>

<p>You can now start the container with <code class="language-plaintext highlighter-rouge">machinectl start debian</code> and open a shell with <code class="language-plaintext highlighter-rouge">machinectl shell debian-base</code>. You can access the logs from the container by running journalctl on the host with <code class="language-plaintext highlighter-rouge">journalctl -M CONTAINER_NAME -f
</code></p>

<p>By default the container uses private mode networking. If you want internet access on the container you need to allow the container to access host networking by creating a file <code class="language-plaintext highlighter-rouge">/etc/systemd/nspawn/CONTAINER_NAME.nspawn</code> with the following contents</p>

<figure class="highlight"><pre><code class="language-ini" data-lang="ini"><span class="nn">[Network]</span>
<span class="py">VirtualEthernet</span><span class="p">=</span><span class="s">no</span></code></pre></figure>

<p>The <code class="language-plaintext highlighter-rouge">mkosi</code> tool can be used to generate container images for other Linux distributions.</p>

<h3 id="run-debian-everywhere">Run debian everywhere</h3>

<p>The <code class="language-plaintext highlighter-rouge">debootstrap</code> tool mentioned above can also be used for running debian on any existing Linux system  including rooted Android phones. The process is documented <a href="https://wiki.debian.org/ChrootOnAndroid">here</a></p>

<h3 id="optimize-bootup-speed">Optimize bootup speed</h3>

<p><code class="language-plaintext highlighter-rouge">systemd-analyze</code> can be used to debug slow bootup. It can even generate a bootchart image.</p>

<figure class="highlight"><pre><code class="language-shell" data-lang="shell">systemd-analyze blame
systemd-analyze critical-chain
systemd-analyze plot <span class="o">&gt;</span> boot.svg</code></pre></figure>

<h3 id="prevent-system-from-going-to-sleep">Prevent system from going to sleep</h3>

<p>If you need to run something that might take a while to complete, without your system going to sleep due to being idle, prepend the command with <code class="language-plaintext highlighter-rouge">systemd-inhibit</code></p>

<figure class="highlight"><pre><code class="language-shell" data-lang="shell">systemd-inhibit backup.sh</code></pre></figure>

<h3 id="run-a-process-with-low-priority">Run a process with low priority</h3>

<p>If you need to run a heavy process in the background without it affecting anything else on the system, run it with nice and ionice:</p>

<figure class="highlight"><pre><code class="language-shell" data-lang="shell"><span class="nb">nice </span>ionice <span class="nt">-c</span> 3 backup.sh</code></pre></figure>

<p>If you have systemd, run:</p>

<figure class="highlight"><pre><code class="language-shell" data-lang="shell">systemd-run <span class="nt">--user</span> <span class="nt">-t</span> <span class="nt">--quiet</span> <span class="nt">--property</span><span class="o">=</span><span class="s1">'CPUWeight=1'</span> <span class="nt">--property</span><span class="o">=</span><span class="s1">'IOWeight=1'</span> backup.sh</code></pre></figure>

<h3 id="authenticate-once-open-multiple-ssh-sessions">Authenticate once, open multiple SSH sessions</h3>

<p>The SSH control master feature allows you to establish a single connection first and then reuse this for subsequent sessions. This is especially useful if your server requires TOTP for login. You won’t need to keep on entering TOTP for every new connection.</p>

<p>Add the following lines to your ssh config file located in <code class="language-plaintext highlighter-rouge">~/.ssh/config</code></p>

<figure class="highlight"><pre><code class="language-ssh" data-lang="ssh"><span class="k">Host</span> *
    <span class="k">ControlMaster</span> <span class="no">auto</span>
    <span class="k">ControlPath</span> ~/.ssh/%r_%h_%p</code></pre></figure>

<h3 id="restrict-ssh-key-to-only-run-a-single-command">Restrict SSH key to only run a single command</h3>

<p>If you need to automate backup over SSH, the ssh key can be <a href="https://wiki.archlinux.org/title/OpenSSH#Restrict">configured</a> to only allow execution of a single command.</p>

<h3 id="mount-remote-server-locally-over-ssh">Mount remote server locally over SSH</h3>

<p>Using sshfs, you can mount a remote server filesystem on a local directory over SSH. This can be useful if you want GUI applications to access the files on the server. No additional software is required on the server and communication is encrypted via SSH.</p>

<figure class="highlight"><pre><code class="language-shell" data-lang="shell">sshfs user@server:/home/user/dir ~/server/</code></pre></figure>

<h3 id="monitor-resource-contention">Monitor resource contention</h3>

<p>The kernel’s <a href="https://docs.kernel.org/accounting/psi.html">pressure stall information</a> lets you monitor how resource contention is affecting your application performance. The best way to monitor this is to use <code class="language-plaintext highlighter-rouge">htop</code>. To add PSI meters to the user interface, Press <code class="language-plaintext highlighter-rouge">F2</code> to enter the setup and select the PSI meters from the <code class="language-plaintext highlighter-rouge">Meters</code> category.</p>

<figure class="highlight"><pre><code class="language-shell" data-lang="shell">PSI some CPU:    13.75%  4.35%  0.99% 
PSI full IO:      0.00%  0.00%  0.00% 
PSI full memory:  0.00%  0.00%  0.00%</code></pre></figure>

<h3 id="control-cpu-governor">Control CPU governor</h3>

<p>You can control the CPU governor by running:</p>

<figure class="highlight"><pre><code class="language-shell" data-lang="shell"><span class="nb">echo </span>powersave | <span class="nb">tee</span> /sys/devices/system/cpu/cpu<span class="k">*</span>/cpufreq/scaling_governor</code></pre></figure>

<p>The list of available governors can be read from <code class="language-plaintext highlighter-rouge">/sys/devices/system/cpu/cpu0/cpufreq/scaling_available_governors</code>.</p>

<p>Setting powersave governor may be of use in embedded systems like raspberry pi, when your power adapter cannot provide enough power to the system when it is run at full CPU load.</p>

<h3 id="bind-mounting">Bind mounting</h3>

<p>Bind mounting lets you mount a directory from one location to another. Some use cases for this are:</p>
<ol>
  <li>Run system on SSD and bind mount HDD partition to directories which are used for storing media or other content which do not require SSD performance.</li>
  <li>To make a directory read-only for use within a container.</li>
  <li>On a raspberry PI, mount a USB SSD on directories that might get lots of writes.</li>
</ol>

<p>You can create read only bind mount by running</p>

<figure class="highlight"><pre><code class="language-shell" data-lang="shell">mount <span class="nt">-o</span> <span class="nb">bind</span>,ro /src/ /home/user/ro</code></pre></figure>

<p>Make this permanent by adding it to <code class="language-plaintext highlighter-rouge">/etc/fstab </code></p>

<figure class="highlight"><pre><code class="language-conf" data-lang="conf">/<span class="n">ssd</span>/<span class="n">src</span> /<span class="n">home</span>/<span class="n">user</span>/<span class="n">src</span> <span class="n">none</span> <span class="n">defaults</span>,<span class="n">bind</span> <span class="m">0</span> <span class="m">0</span></code></pre></figure>

<p>Now run <code class="language-plaintext highlighter-rouge">systemctl daemon-reload</code> and then <code class="language-plaintext highlighter-rouge">mount -a</code></p>

<h3 id="reduce-reserved-blocks-in-ext4-filesystem">Reduce reserved blocks in ext4 filesystem</h3>

<p>By default 5% of the ext4 filesystem will be allotted for reserved blocks, on a large disk this might waste a lot of space which may not be necessary depending upon on how the disk is used. You can <a href="https://wiki.archlinux.org/title/Ext4#Reserved_blocks">reduce it with tune2fs</a> to free up some space.</p>

<h3 id="access-cloud-storage-from-the-terminal">Access cloud storage from the terminal</h3>

<p><a href="https://rclone.org/">rclone</a> can be used to access your files stored on cloud providers from a terminal. Its <a href="https://rclone.org/crypt/">crypto remote</a> feature can provide client side encryption.</p>

<h3 id="prevent-critical-files-from-accidental-deletion">Prevent critical files from accidental deletion</h3>

<p>The immutable file attribute can be set on a file to prevent even root user from deleting it</p>

<figure class="highlight"><pre><code class="language-shell" data-lang="shell">chattr +i important.txt</code></pre></figure>

<p>The immutable flag needs to be removed with <code class="language-plaintext highlighter-rouge">chattr -i important.txt</code> before the file can be deleted.</p>

<h3 id="monitor-files-accessed-by-the-system">Monitor files accessed by the system</h3>

<p>The <code class="language-plaintext highlighter-rouge">fatrace</code> can list out all the files that are being accessed in the system.</p>

<h3 id="avoid-frequent-password-authentication">Avoid frequent password authentication</h3>

<p>You can avoid having to frequently enter your user password when running certain software by adding your user account to the associated group as given below.</p>

<p><code class="language-plaintext highlighter-rouge">usermod -a -G GROUPNAME USERNAME</code></p>

<table>
  <thead>
    <tr>
      <th>group name</th>
      <th>Use for</th>
    </tr>
  </thead>
  <tbody>
    <tr>
      <td>dialout</td>
      <td>Access to serial port</td>
    </tr>
    <tr>
      <td>systemd-journal</td>
      <td>Access to systemd system logs</td>
    </tr>
    <tr>
      <td>libvirt</td>
      <td>Access to libvirt virtual machines</td>
    </tr>
    <tr>
      <td>render</td>
      <td>AMD ROCm</td>
    </tr>
  </tbody>
</table>

<p>After making the change a reboot(or logout and log back in) is necessary.</p>

<h3 id="use-1271-instead-of-127001">Use 127.1 instead of 127.0.0.1</h3>

<p>Due to how <a href="https://linux.die.net/man/3/inet_aton">inet_aton</a> works, you can replace <code class="language-plaintext highlighter-rouge">127.0.0.1</code> with <code class="language-plaintext highlighter-rouge">127.1</code>. Similarly cloudflare DNS <code class="language-plaintext highlighter-rouge">1.0.0.1</code> can be replaced with <code class="language-plaintext highlighter-rouge">1.1</code></p>

<h3 id="recovering-from-server-running-out-of-disk-space">Recovering from server running out of disk space</h3>

<p>On your server create a large empty file by running:</p>

<figure class="highlight"><pre><code class="language-shell" data-lang="shell">fallocate <span class="nt">-l</span> 1G EMPTY_FILE</code></pre></figure>

<p>If your server ever runs out of disk space, logging in, deleting this file and restarting your applications will quickly restore functionality, giving you plenty of time to figure out what is using up all the space.</p>

<h3 id="reduce-memory-usage-when-running-multiple-vms">Reduce memory usage when running multiple VMs</h3>

<p>With <a href="https://www.kernel.org/doc/html/latest/admin-guide/mm/ksm.html">Kernel Samepage Merging</a>, pages containing identical data across multiple virtual machines can be merged into a single one to save memory. To activate it run:</p>

<figure class="highlight"><pre><code class="language-shell" data-lang="shell"><span class="nb">echo </span>1  <span class="o">&gt;</span> /sys/kernel/mm/ksm/run</code></pre></figure>

<p>According to your needs, modify the <code class="language-plaintext highlighter-rouge">/sys/kernel/mm/ksm/sleep_millisecs</code> and <code class="language-plaintext highlighter-rouge">/sys/kernel/mm/ksm/pages_to_scan</code> file. You can then read how many pages are being shared from <code class="language-plaintext highlighter-rouge">/sys/kernel/mm/ksm/pages_shared</code></p>

<h3 id="remove-packages-with-apt-by-appending-a--">Remove packages with apt by appending a “-“</h3>

<p>While running the <code class="language-plaintext highlighter-rouge">apt install</code> command you can instruct apt to remove packages by appending a <code class="language-plaintext highlighter-rouge">-</code> to the packages you want removed.</p>

<figure class="highlight"><pre><code class="language-shell" data-lang="shell">apt <span class="nb">install </span>cmake gradle-</code></pre></figure>

<p>The above command will install <code class="language-plaintext highlighter-rouge">cmake</code> and remove <code class="language-plaintext highlighter-rouge">gradle</code></p>

<h3 id="adding-third-party-repositories-with-extrepo">Adding third party repositories with extrepo</h3>

<p>The <code class="language-plaintext highlighter-rouge">extrepo</code> package makes adding third party software repositories easier. You can find the list of supported repositories in <code class="language-plaintext highlighter-rouge">/usr/share/extrepo/offline-data/debian/</code>. For instance to add the gitlab repository you can run</p>

<figure class="highlight"><pre><code class="language-shell" data-lang="shell">extrepo <span class="nt">--offline</span> <span class="nb">enable </span>gitlab_ce</code></pre></figure>

<p>This will install apt sources.list file and the GPG key used for signing the packages.</p>]]></content><author><name></name></author><summary type="html"><![CDATA[If you are someone new to Linux i hope the following will help you out. This guide assumes you are running on Debian(or a Debian derivative)]]></summary></entry><entry><title type="html">Growing coriander indoors with 300mW of light</title><link href="https://aa55.dev/2024/11/23/300mw-coriander.html" rel="alternate" type="text/html" title="Growing coriander indoors with 300mW of light" /><published>2024-11-23T23:13:59+05:30</published><updated>2024-11-23T23:13:59+05:30</updated><id>https://aa55.dev/2024/11/23/300mw-coriander</id><content type="html" xml:base="https://aa55.dev/2024/11/23/300mw-coriander.html"><![CDATA[<p>In every indoors farm I’ve seen, the lights used were full spectrum, high power consumption LEDs, kept at a distance away from the plant. I wanted to try out what would happen if a low power, cheap, closely placed LEDs were used instead.</p>

<p>For this experiment, I will be growing the plant from seeds. I chose coriander since they were easy to grow and i had prior experience with growing them.</p>

<p>For lighting, i chose the IKEA JANSJÖ. These cost only $8 and are powered via USB. According to IKEA they only consume 300mW of power. I’ve never verified the power consumption but i would take their word for it. These have goose neck, reflector and lens which would make it easy for us to bend it and position the LED right on top of the leaves.</p>

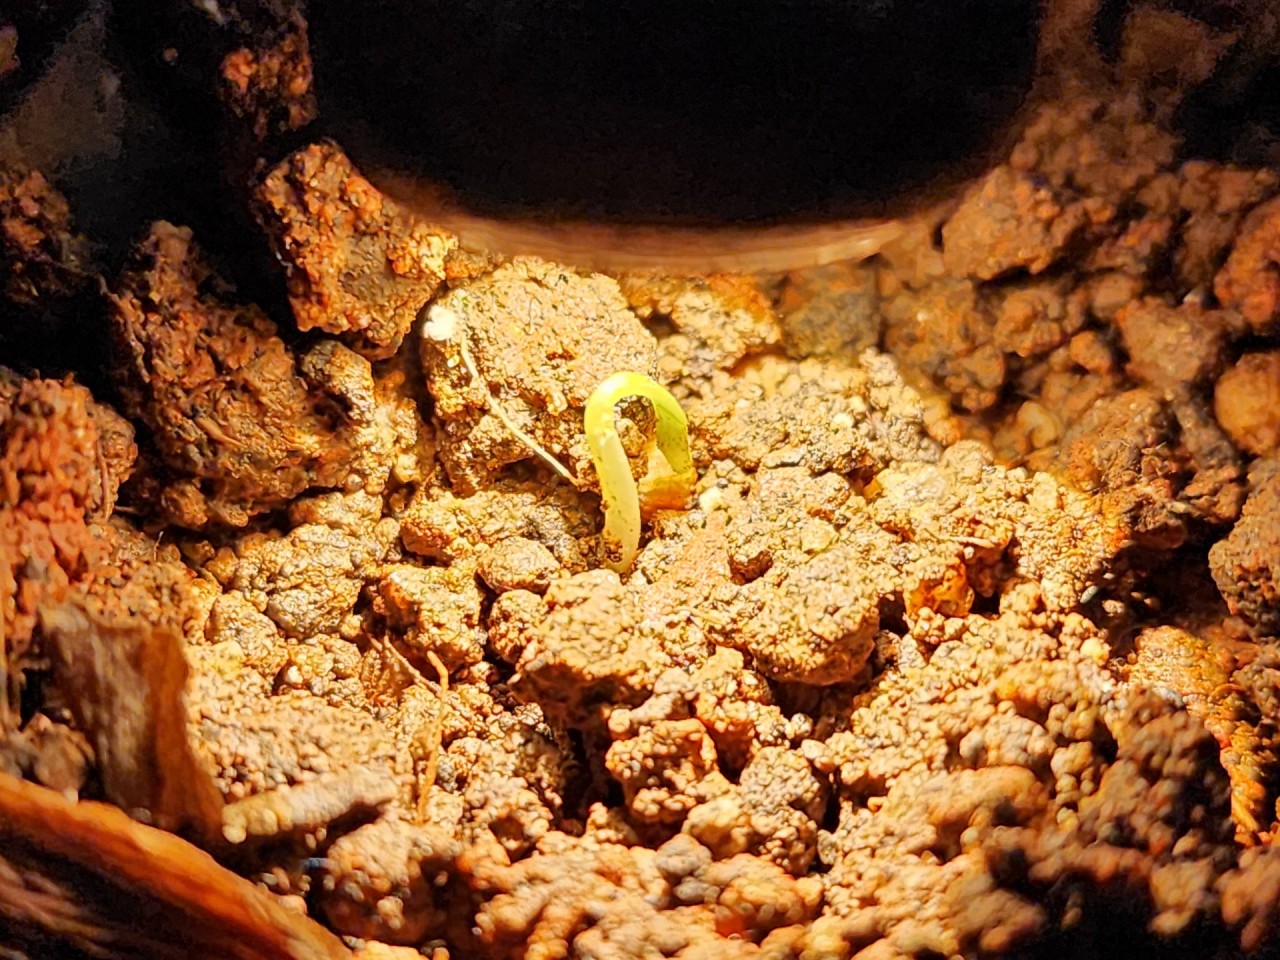
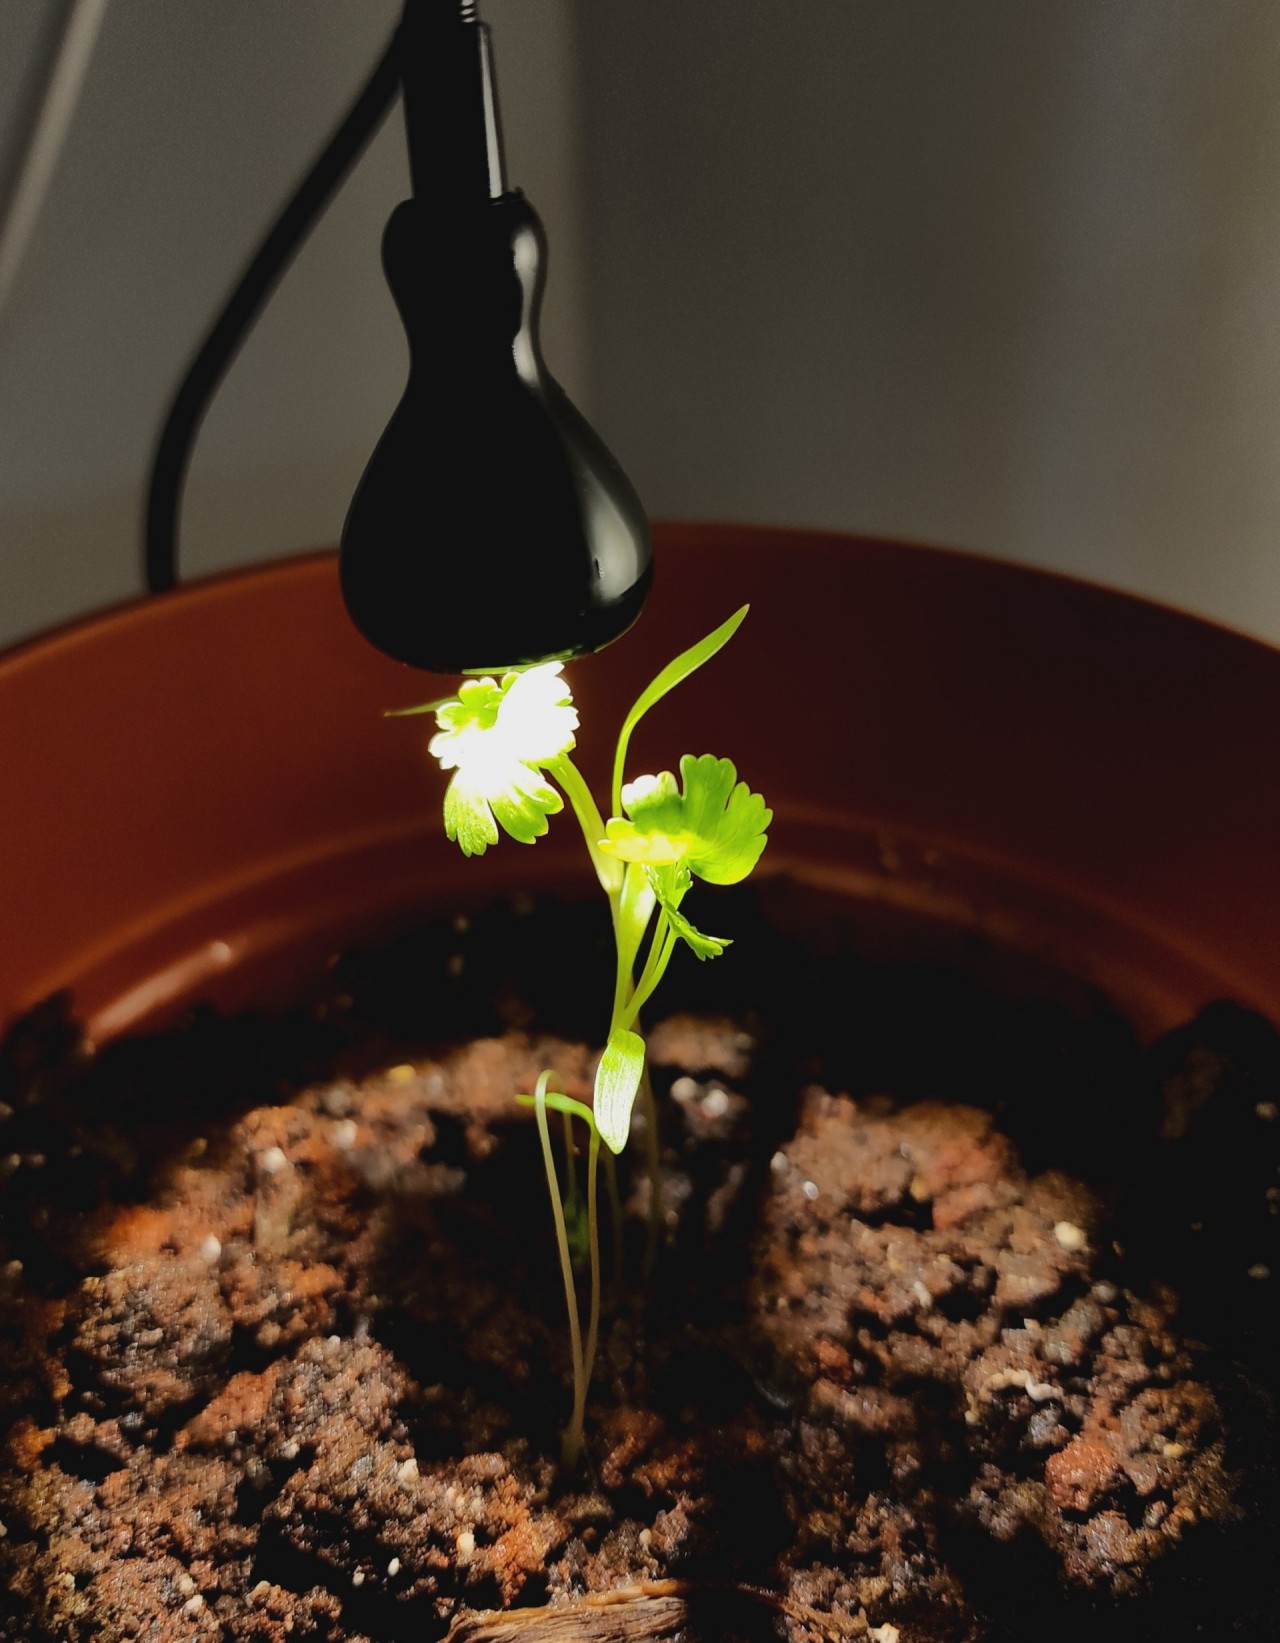
<p>After planting, the seeds took 15 days to sprout. The LED lights were installed after the seeds had sprouted. The LED was always kept as close to the plant as possible, never more than 5cm away. In most cases the LED was in direct contact with the leaves. The LED doesn’t produce much heat and therefore won’t burn the leaves on contact. The LED was powered on for about 10-12 hours per day. The pot was placed in a dark room without any other sources of either artificial or natural light.</p>

<table>
  <thead>
    <tr>
      <th style="text-align: center"><img src="/assets/images/day1.jpg" alt="Newly sprouted seedling" /></th>
    </tr>
  </thead>
  <tbody>
    <tr>
      <td style="text-align: center">Day 1</td>
    </tr>
  </tbody>
</table>

<table>
  <thead>
    <tr>
      <th style="text-align: center"><img src="/assets/images/day14.jpg" alt="Plant 14 days later" /></th>
    </tr>
  </thead>
  <tbody>
    <tr>
      <td style="text-align: center">Day 14</td>
    </tr>
  </tbody>
</table>

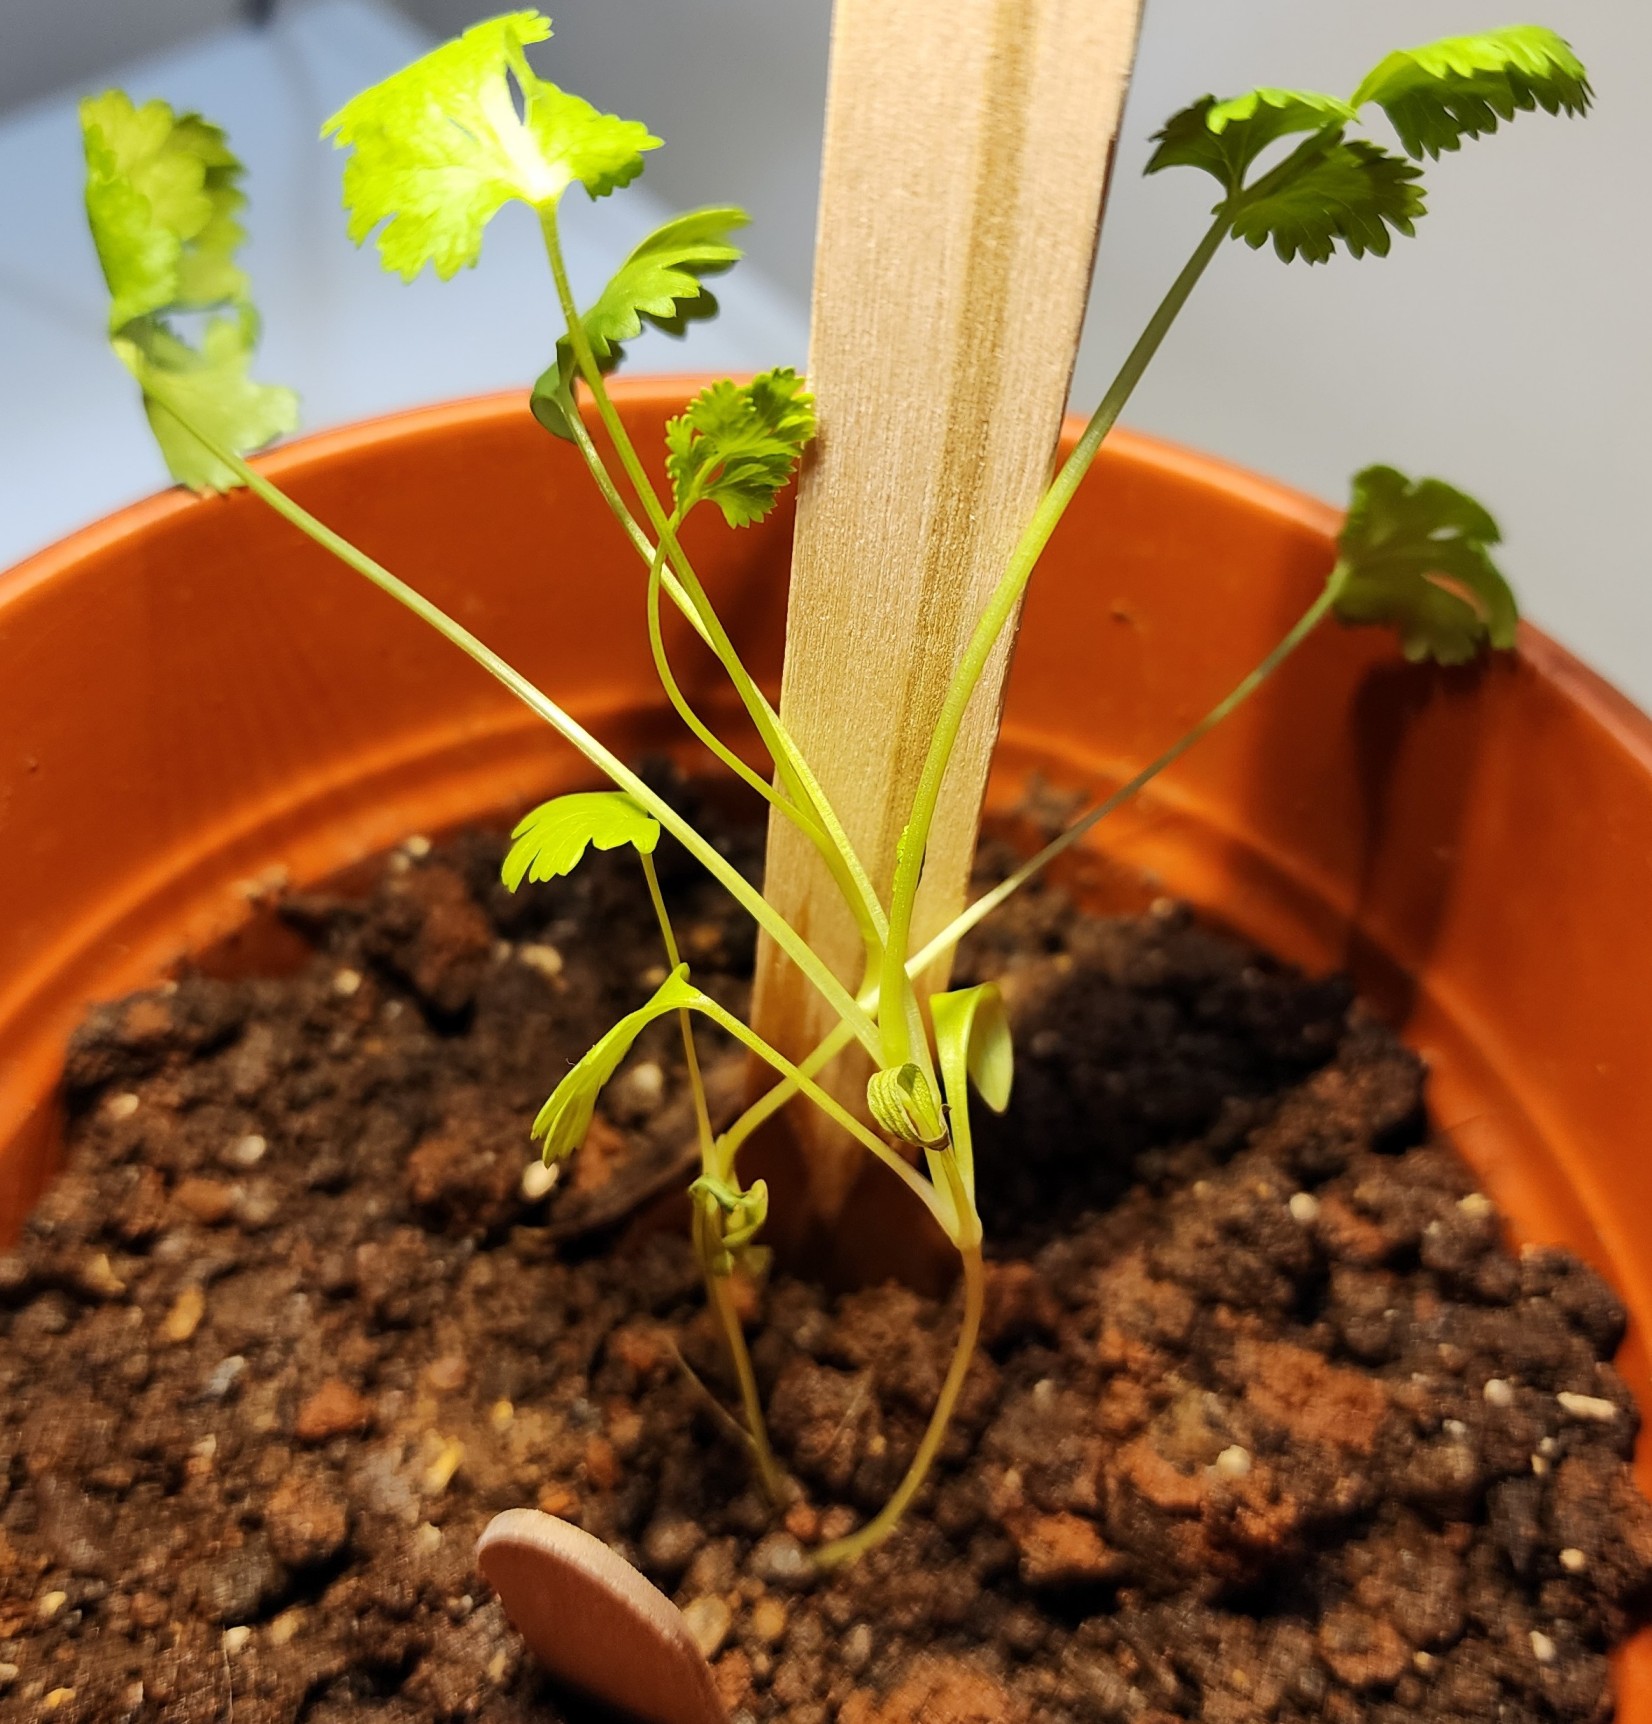
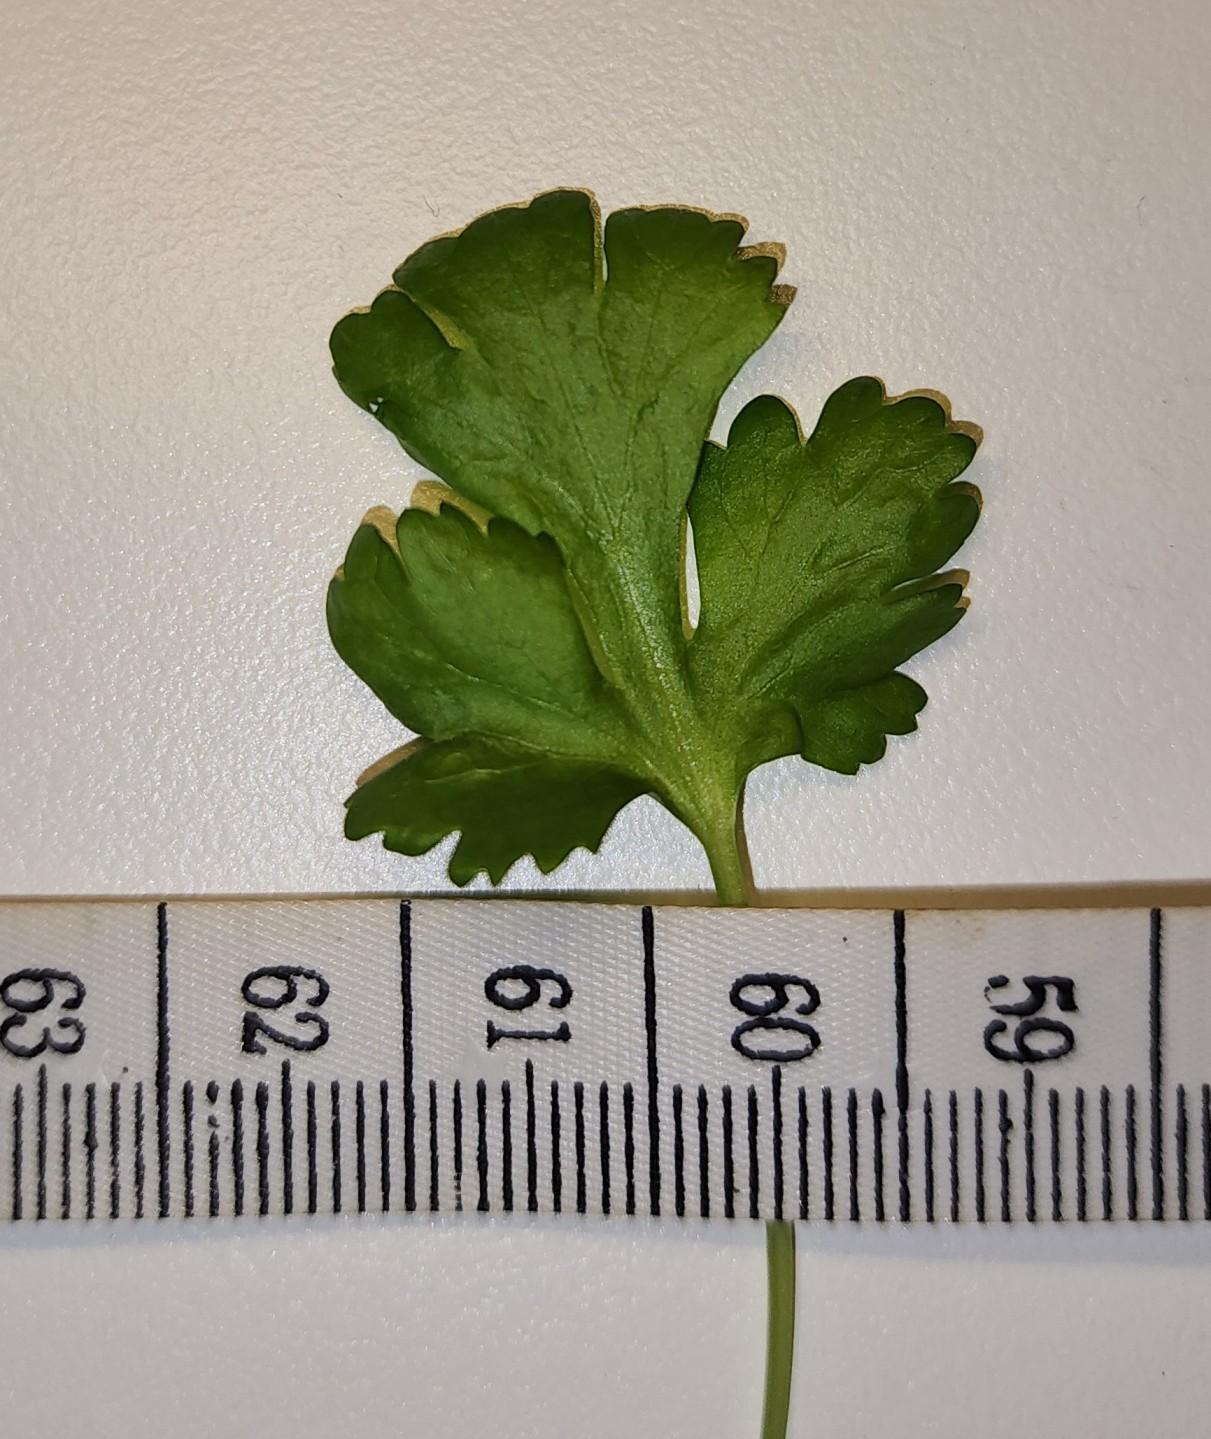
<p>After 30 days, the plant had grown to a height of 12cm with the biggest leaf having a length of 3cm. The plant doesn’t look very healthy but then again they only had access to 300mW of light. One improvement that could have been made was to place a sheet of Aluminium foil around the plant to reflect as much light as possible back on to the plant</p>

<table>
  <thead>
    <tr>
      <th style="text-align: center"><img src="/assets/images/day30_plant.jpg" alt="Plant 30 days later" /></th>
    </tr>
  </thead>
  <tbody>
    <tr>
      <td style="text-align: center">Day 30, plant</td>
    </tr>
  </tbody>
</table>

<table>
  <thead>
    <tr>
      <th style="text-align: center"><img src="/assets/images/day30_leaf.jpg" alt="Plant leaf 30 days later" /></th>
    </tr>
  </thead>
  <tbody>
    <tr>
      <td style="text-align: center">Day 30, plant leaf</td>
    </tr>
  </tbody>
</table>]]></content><author><name></name></author><summary type="html"><![CDATA[In every indoors farm I’ve seen, the lights used were full spectrum, high power consumption LEDs, kept at a distance away from the plant. I wanted to try out what would happen if a low power, cheap, closely placed LEDs were used instead.]]></summary></entry></feed>